Creating Additional Virtual Servers
In this article, you create
default virtual servers on Server01, which is a multihomed back-end
server. In general, you create a new virtual server if you require
different levels of authentication for different groups of users, or
different access criteria, or if you want some, but not all, traffic to
be encrypted. Additional virtual servers can also provide the following
facilities that are specific to the server protocol:
HTTP
You can create additional HTTP virtual servers to provide for a number
of different collaboration scenarios where different levels of
authentication and access control are required. You can use additional
HTTP virtual servers to supplement access to folders that the default
Web site provides. When you create an additional HTTP virtual server,
you also create an additional virtual directory. You can use additional
virtual directories to publish content that is not contained within the
server’s own directory structure. NNTP
You can create additional NNTP virtual servers to host multiple domains
on a single Exchange server. You can, for example, use the default
virtual server to access public newsgroups and implement public
newsfeeds and to create an additional virtual server for internal
newsgroups. POP3 and IMAP4
You create additional POP3 and IMAP4 virtual servers if you have groups
of clients with differing requirements. For example, you might have one
group of POP3 clients that can understand messages in MIME format while
another group uses uuencode. Where there are sufficient numbers in both
groups, you would create an additional virtual server. If there were
only a few users in the second group, you would configure per-user
settings. SMTP You
can create an additional SMTP virtual server and configure one virtual
server to handle Internet e-mail while the other handles internal
e-mail. You can also create an additional virtual server to support open
relaying for POP3 and IMAP4 clients. Often, however, configuration is
best implemented on an SMTP connector rather than on a virtual server.
Configuring Virtual Server Settings
When you create
virtual servers, you assign identities to them and specify parameters,
such as IP address and, if necessary, TCP and SSL port numbers. You can
configure additional settings on a new virtual server when you create
it, or you can create it and configure it later. If you want to change
the configuration on a running virtual server, then you should pause the
server before making the configuration change and restart it
afterwards.
Configuring an HTTP Virtual Server
When you create a new HTTP
virtual server, you need to assign a unique identity—that is, a unique
combination of IP address, TCP port, SSL port, and host name. You also
need to configure the server’s virtual directory by providing access to a
public folder and to a mailbox. When you have created a new virtual
server, you can configure it using Exchange System Manager. (Remember
that the default HTTP virtual server—the Exchange virtual server—is
configured using IIS.) You can do any or all of the following:
Limit
the number of concurrent connections to the virtual server and
configure the number of seconds that must elapse before an unsuccessful
connection times out. Control
access to the server by setting connection limits, configuring read,
write, and browse permissions, setting script and executable access, and
editing authentication methods (allowing anonymous access, if
required). Create
additional virtual directories to publish content not contained within
the server’s own directory structure. Virtual directories appear to
client browsers as though they are part of the virtual server’s
directory tree. You can also set a default document.
Configuring POP3 and IMAP4 Virtual Servers
The
procedures to create and configure POP3 and IMAP4 virtual servers are
almost identical. When you create a new POP3 virtual server, you
complete the New POP3 Virtual Server Wizard to specify the server’s IP
address and TCP port. When you create a new IMAP4 virtual server, you
complete the New IMAP4 Virtual Server Wizard to specify the server’s IP
address and TCP port. After you complete the appropriate wizard, you can
configure the settings using Exchange System Manager. You can do any or
all of the following:
Control access
to the server by editing the authentication methods. If you want to
enable SSL encryption, you need to obtain, install, and associate a
certificate. Secure access by IP address, subnet, or domain name. Limit
the number of connections that can be made to the virtual server at any
one time and the length of time that idle connections remain logged on
to the server. By default, Exchange disconnects idle sessions after 30
minutes. Configure
client support by specifying message formats. On POP3 virtual servers,
you can specify uuencode and support Macintosh clients by specifying
BinHex for Macintosh. Disable
complete public folder listings to improve the performance of clients
that have difficulty with a large number of folders (IMAP4 only). Enable fast message retrieval to improve performance for clients that do not require exact message sizes (IMAP4 only).
Configuring NNTP Virtual Servers
You create
additional NNTP virtual servers by completing the New NNTP Virtual
Server Wizard. This lets you specify the IP address and TCP port. You
also need to specify the path to internal files, the storage medium, and
the path to the virtual directory that stores the news content. After
you complete the wizard, you can configure the settings using Exchange
System Manager. You can do any or all of the following:
Set connection and posting limits. Control
access to the server by editing the authentication methods. If you want
to enable SSL encryption, you need to obtain, install, and associate a
certificate. You can also secure access by IP address, subnet, or domain
name. Create a
newsgroup and a newsgroup expiration policy. If you create a moderated
newsgroup, you need to specify the path to the directory that stores
articles until moderators approve them. You should specify the path to
the pickup directory of the SMTP virtual server that is used for
moderated groups. Normally, this is the default SMTP virtual server and
the path is \Inetpub\Mailroot\Pickup. Create a newsfeed in either a master/subordinate or peer configuration.
Configuring SMTP Virtual Servers
You
create additional SMTP virtual servers by completing the New SMTP
Virtual Server Wizard. This lets you specify the IP address. If you want
to change the default settings for the TCP port and the SSL port, you
can do so by using Exchange System Manager. You can also use Exchange
System Manager to do any or all of the following:
Configure incoming and outgoing connections. Specify
authentication settings for incoming connections and for outbound
messages. If required, you can also set up the virtual server to resolve
anonymous e-mail. Take care with this setting. If you configure an SMTP
virtual server to resolve anonymous e-mails, it is possible for
unauthorized users to send e-mail by using the forged address of
legitimate users. Specify TLS encryption, if you have obtained the necessary certificate. Set
IP address and domain name restrictions, and grant or deny submit
permissions to users or groups. You can also configure filtering. Configure
relaying. Be careful to restrict this as severely as possible; open
relaying can increase the risk of your Exchange organization being used
for junk mail propagation. Specify
limits for message size, number of recipients, and the number of
messages per connection. You can also change the location of the SMTP
queue. Specify a
storage location for copies of non-delivery report (NDR) messages and
configure a masquerade domain to replace the actual identity of that
storage location in the outgoing message heading. Configure
message delivery by specifying retry intervals and message hop count.
You can also specify fully qualified domain name (FQDN) and configure
the server either as a smart host or to forward outgoing e-mail to a
smart host. You can enable reverse DNS lookup and create a reverse DNS
list.
Tip A masquerade domain
on an SMTP virtual server replaces the local domain name used in Mail
From lines in the protocol. The replacement occurs on the first hop only
and refers to the SMTP message heading information. The From line
displayed by e-mail clients is in the message body. The masquerade
domain name does not change this. |
As you can see from the
above list, you have many configuration options on a virtual SMTP
server. You can also configure connections (such as a dial-up connection
to an ISP) using the Routing And Remote Access console, and you need to
configure DNS support. Also, it is often good practice to configure
settings on an SMTP connector that uses a virtual server as a
bridgehead, rather than on the server itself.
Front-End and Back-End Configuration
You
can manage Internet access protocols on a separate server from the one
on which the message store runs by deploying a front-end and back-end
configuration. A front-end server does not store mailboxes or other
sensitive information and can therefore interface more securely with the
Internet and with external sectors of a large intranet or extranet. A
front-end and back-end configuration provides a unified namespace and a
reduction of overhead for SSL encryption.
Internet protocol virtual
servers on front-end Exchange Server 2003 servers handle incoming client
connections, while the back-end virtual servers are dedicated to
running the databases. You need to create a virtual HTTP server on each
back-end server to handle front-end requests.
In topologies
that contain Exchange Server 2003 front-end and back-end servers, the
implementation of authentication settings varies between server roles.
On front-end servers, the type of authentication used by IMAP4 and POP3
virtual servers is set to basic authentication and cannot be changed
(although you can specify SSL encryption). On POP3 and IMAP4 back-end
servers, you can select basic authentication or Integrated Windows
Authentication. You have the option to specify encryption if you use
basic authentication on back-end servers, but typically you would not do
so. Integrated Windows Authentication cannot be specified on front-end
additional HTTP virtual servers.
The
implementation of the connection time-out setting varies between server
roles. On back-end servers, the connection time-out setting limits the
length of time for which a client is permitted to remain connected to
the server without performing any activity. On front-end servers, the
connection time-out setting limits the total length of the client’s
session, regardless of client activity. You should therefore configure
this setting on your front-end servers so that your users can download
the maximum message size permitted over the slowest supported connection
speed. This ensures that your clients are not disconnected while
downloading messages.
Tip Scenario-type
exam questions may present you with a situation where configuration
settings are not having the expected effect. If a question states that
user connections are timing out during large downloads, then look for a
configuration on a front-end server that specifies an idle time rather
than a total session value. |
If POP3 clients use
calendaring, then you need to configure the POP3 clients to keep copies
of their messages on the server. If the POP3 client is configured to
delete mail from the server after it has been downloaded to the client,
clicking the URL within the meeting request will result in an HTTP 404
error, indicating that the OWA meeting request is not available.
Caution If
your Exchange Server 2003 organization uses front-end and back-end
servers, you should configure the URL your users use to access
calendaring information on the Calendaring tab of the POP3 and IMAP4
virtual servers on your back-end server. Exchange does not recognize any
URL settings configured on the Calendaring tab of your front-end
servers. |
Practice: Creating and Configuring Virtual Servers
In this practice, you
create and configure virtual servers for all the supported Internet
protocols. Before you do this, however, you need to create
mailbox-enabled users to associate with the virtual servers.
Exercise 1: Create Mailbox-Enabled Users
The Active Directory
Users And Computers console manages user objects such as mailboxes. When
Exchange System Manager is installed on a Windows Server 2003 server, a
set of extensions is added to the standard console. This allows you to
create an Exchange mailbox for user accounts.
You need to create
mailbox-enabled users for IMAP4 and POP3 clients. You also need user
accounts that can send e-mail to each other for testing purposes. You
use the normal procedure for creating a user in Active Directory. When
Exchange System Manager is installed, new users are mailbox-enabled by
default.
To create mailbox-enabled users, perform the following steps:
1. | Access the Active Directory Users And Computers console.
| 2. | In the console tree, double-click the domain node, right-click the Users folder, point to New, and then click User.
| 3. | Type Don Hall in the Full Name box and type d.hall in the User Logon Name box. Click Next.
| 4. | Clear
the User Must Change Password At Next Logon check box. Select the User
Cannot Change Password and Password Never Expires boxes. Specify the
password as password&2. Click Next.
| 5. | Confirm that the Create An Exchange Mailbox box is selected by default. Click Next.
| 6. | Click Finish.
| 7. | Use the same procedure to add the users listed in Table 1. If you want to send or retrieve mail as one of these users, then use the runas utility.
Table 1. Mailbox-Enabled Users| Full name | User logon name | Password |
|---|
| Kim Akers | k.akers | password&2 | | Michelle Alexander | m.alexander | password&2 | | Sean Alexander | s.alexander | password&2 | | Michael Allen | m.allen | password&2 | | Nancy Anderson | n.anderson | password&2 |
|
Exercise 2: Create an HTTP Virtual Server
In this exercise,
you create an additional HTTP virtual server on Server01. Typically, you
create an HTTP virtual server on a back-end server to support each of
your front-end servers. In this and subsequent exercises, you define the server’s unique
identity, set its Exchange path, limit the number of concurrent
connections, specify the number of seconds that must elapse before an
unsuccessful connection times out, set read, write, and browse
permissions on the virtual directory, and set script and executable
access. You also enable forms-based authentication and configure
compression settings for OWA.
An HTTP virtual server is
identified on the network by a unique combination of IP address, host
name, TCP port, and, if encryption is enabled, SSL port. For each
virtual server that you create, you must define one virtual directory as
the root of the server for publishing content. If you want to set the
virtual server’s Exchange path to a public folder store, you need to
create a public folder for this purpose.
To create a new HTTP virtual server, perform the following steps:
1. | Start Exchange System Manager.
| 2. | Navigate to Administrative Groups\First Administrative Group\Servers\Server01\Protocols\HTTP.
| 3. | In the console tree, right-click HTTP, point to New, and then click HTTP Virtual Server.
| 4. | On the General tab, type HTTP_server1 in the Name box.
| 5. | In the IP Address drop-down list, select the IP address of Local Area Connection 2.
| 6. | To assign a unique identity, click Advanced, and then click Add.
| 7. | In the Host Name box, type virtual, as shown in Figure 1, and then click OK.
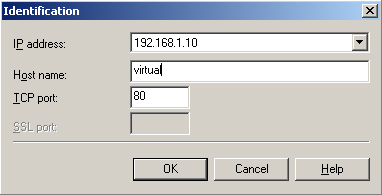
| 8. | Click OK to close the Advanced dialog box, and then click Apply on the General tab.
Note You
can differentiate a virtual server by IP address, TCP port number, host
name, or any combination of the three. If, however, you differentiate
by host name only, you need additional entries in DNS to direct the
browser to access a specific virtual server. Microsoft recommends that
you avoid differentiating by host name only. |
| 9. | To provide access to a public folder, select Public Folder under Exchange Path on the General tab.
| 10. | Click Modify, select a folder from the tree, and then click OK.
| 11. | To
provide access to an SMTP mailbox domain and configure the virtual
server’s route, select Mailboxes For under Exchange Path on the General
tab. If you want to provide access to mailboxes for an SMTP domain other
than the one listed, click Modify, select an SMTP domain, and then
click OK.
| 12. | Click
OK to close the virtual server Properties dialog box. Check whether the
new HTTP virtual server has started. If not, start it.
|
Exercise 3: Configure an HTTP Virtual Server
To configure the additional HTTP virtual server, perform the following steps:
1. | Start Exchange System Manager.
| 2. | Navigate to Administrative Groups\First Administrative Group\Servers\Server01\Protocols\HTTP.
| 3. | Right-click HTTP_server1, and then click Pause.
| 4. | Right-click HTTP_server1, and then click Properties.
| 5. | To
limit the number of concurrent connections to the virtual server,
select Limit Number Of Connections on the General tab, and then type the
limit in the text box.
| 6. | To
configure the number of seconds that must elapse before an unsuccessful
connection times out, type the number of seconds in the Time-Out (Secs)
text box. The default is 900.
Note When
you set permissions on a virtual directory, all users are granted the
same permissions to access the folders or mailboxes the virtual
directory specifies. Virtual server settings do not override permission
to access mailboxes and public folders set on the user’s account. |
| 7. | To configure read, write, and browse permissions on the virtual server’s root directory, click the Access tab.
| 8. | Use the check boxes to grant or deny all users the ability to read, write, or browse directories, as shown in Figure 2.

Note This
procedure sets permissions on the root directory. If you want to set
permissions on additional virtual directories, expand the HTTP virtual
server in Exchange System Manager, right-click a virtual directory, and
then click Properties. |
| 9. | When
you grant script access or enable scripts to run, you allow all
connected users to view the source of the scripts and to run the
scripts. You set script and executable access on the Access tab as
follows:
Allow users
to view the script code by selecting the Script Source Access check box
in the Access Control section, if it is not already selected. Restrict all users from running scripts by selecting None in the Execute Permissions section. Allow all users to execute scripts but not executables by selecting Scripts in the Execute Permissions section. Allow all users to execute both scripts and executables by selecting Scripts And Executables in the Execute Permissions section.
| 10. | Click OK to close the virtual server Properties dialog box.
| 11. | Right-click the virtual server, and then click Pause to restart it.
|
Exercise 4: Configure Forms-Based Authentication
You can use
Exchange System Manager to configure OWA settings for both the default
HTTP virtual server and any additional HTTP virtual servers you create. Forms-based authentication
provides additional security for OWA users. When you enable forms-based
authentication, a new logon page for OWA will store the user’s user
name and password in an in-memory session cookie instead of in the
browser. When a user closes the browser, the cookie is cleared. It is
also cleared automatically after a period of inactivity. If you enable
forms-based authentication, then you have the option of enabling compression.
The low compression setting will compress static files only; the high
compression setting will compress both static and dynamic files.
To enable forms-based authentication and set compression, perform the following steps:
1. | Start Exchange System Manager.
| 2. | Navigate to Administrative Groups\First Administrative Group\Servers\Server01\Protocols\HTTP.
| 3. | Right-click the virtual server that you want to configure, and then click Pause.
| 4. | Right-click the paused server, and then click Properties.
| 5. | Click the Settings tab.
| 6. | Select the Enable Forms Based Authentication check box on the Outlook Web Access pane.
| 7. | Select a compression level from the Compression drop-down menu.
| 8. | Click OK to close the virtual server Properties dialog box.
| 9. | Right-click the paused server. Click Pause again to restart it.
|
Exercise 5: Create a POP3 Virtual Server
In
this exercise, you create an additional virtual server to support POP3
clients and then, in the next exercise, you configure the virtual
server. You can use the same procedures to configure the default virtual
server. When you create a new POP3 virtual server, it is disabled by
default, so there is no need to pause it for configuration. If you
configure it correctly, then it should start automatically. If you want
to alter the configuration on a running server, you should pause it
first.
You can create
additional virtual servers on a single computer to handle multiple local
mail domains and provide administration for several messaging
scenarios. In this exercise, you create an additional virtual server on
the back-end Exchange server, Server01.
To create a POP3 virtual server, perform the following steps:
1. | Start Exchange System Manager.
| 2. | Navigate to Administrative Groups\First Administrative Group\Servers\Server01\Protocols\POP3.
| 3. | In the console tree, right-click POP3, point to New, and then select POP3 Virtual Server.
| 4. | The New POP3 Virtual Server Wizard starts. In the Name box, type POP3_server1, and then click Next.
| 5. | In the Select The IP Address For This Virtual Server drop-down menu, select the IP address of Local Area Connection 2.
| 6. | Click Finish. The wizard closes and a disabled virtual server is created. You can now configure this virtual server.
|
Exercise 6: Configure a POP3 Virtual Server
In this exercise, you
configure the new POP3 virtual server that you created. In this exercise, you configure connection settings, restrict access by
IP address, subnet, or domain, specify message format, and examine the
calendaring settings.
To configure the new POP3 virtual server, perform the following steps:
1. | Start Exchange System Manager.
| 2. | Navigate to Administrative Groups\First Administrative Group\Servers\Server01\Protocols\POP3.
| 3. | Right-click POP3_server1, and then click Properties.
| 4. | On
the General tab, click Advanced. If you want to, you can alter the
settings for the IP address, TCP port, and SSL port by clicking Add. You
do not need to do so at this point, so click Cancel.
| 5. | You
can limit the number of connections to prevent the POP3 virtual server
from becoming overloaded. Click Limit Number Of Connections To on the
General tab, and then type an integer between 1 and 1,999,999,999.
| 6. | To
limit the length of time idle connections remain logged on to the
server, specify the maximum time in the Connection Time-Out (Minutes)
box.
| 7. | To
selectively include or exclude single computers, subnets, and domains
from accessing a POP3 virtual server, select the Access tab and click
Connection.
| 8. | To
allow only specified computers, groups of computers, or domains to
access the virtual server, select Only The List Below, and then click
Add. You can then specify one of the following:
The static address of a single computer A group of computers with contiguous IP addresses, defined by the subnet address and mask A domain, defined by the complete domain name
Note If
you want more practice in using a network address and a subnet mask to
specify a range of IP addresses, there are many excellent tutorials on
the Internet, for example, at http://learntosubnet.com. |
| 9. | Click OK to return to the Connection dialog box.
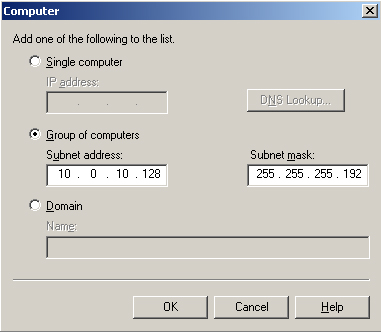
| 10. | To
restrict specified computers, groups of computers, or domains from
accessing the virtual server, select All Except The List Below, and then
click Add. As before, you can specify a single IP address, a subnet, or
a domain. Figure 3 shows a subnet specification.
| 11. | Click OK to return to the Connection dialog box.
| 12. | Click OK to close the Connection dialog box.
| 13. | To specify the message format that your POP3 clients support, click the Message Format tab.
| 14. | If your clients support MIME encoding, then select MIME. You can then specify one of the following:
Use RTF. You
specify this by selecting the Use Exchange Rich-Text Format check box.
This disables the other MIME options. (You can also specify RTF if your
clients use uuencode.) Provide Message Body As Plain Text Provide Message Body As HTML Both
| 15. | If
your clients support uuencode, then select UUEncode; if you are
supporting Macintosh clients, then select Use Binhex For Macintosh.
| 16. | If
multiple character sets exist for one code page, then Exchange uses the
character setting specified on the Message Format tab. You can select a
character set in the Character Set drop-down menu.
| 17. | To
configure the OWA server that POP3 clients access when they download
meeting requests, click the Calendaring tab. By default, the back-end
Exchange server is specified. You can specify a front-end server if you
need to do so.
| 18. | Click OK to close the virtual server Properties dialog box.
|
Exercise 7: Create and Configure an IMAP4 Virtual Server
This is almost identical to creating and configuring a POP3 virtual server. There are three differences:
On the General tab, you can specify fast message retrieval. On the General tab, you can specify whether to include all public folders when a folder list is requested. On the Message Format tab, you cannot specify uuencode. You cannot, therefore, specify BinHex for Macintosh.
In this practice, you
will create an IMAP4 virtual server and enable fast message retrieval.
If you want to do any further configuration, refer to the instructions
for the POP3 virtual server.
Tip Watch
out for answers in the exam where an administrator enables fast message
retrieval for POP3 clients or specifies uuencode for IMAP4 clients. You
can reject these answers. |
To create and configure an IMAP4 virtual server, perform the following steps:
1. | Start Exchange System Manager.
| 2. | Navigate to Administrative Groups\First Administrative Group\Servers\Server01\Protocols\IMAP4.
| 3. | In the console tree, right-click IMAP4, point to New, and then select IMAP4 Virtual Server.
| 4. | The New IMAP4 Virtual Server Wizard starts. In the Name box, type IMAP4_server1, and then click Next.
| 5. | From the Select The IP Address For This Virtual Server drop-down menu, select the IP address of Local Area Connection 2.
| 6. | Click Finish. The wizard closes, and a disabled virtual server is created.
| 7. | Right-click the new IMAP4 virtual server, and then click Properties.
| 8. | On the General tab, select the Enable Fast Message Retrieval check box.
| 9. | Click OK to close the virtual server Properties dialog box.
|
Exercise 8: Create an NNTP Virtual Server
In this exercise, you
create an additional NNTP virtual server. You need to create folders to
store NNTP files and newsgroups, and you can do this either before you
start or while you are creating the virtual server. When you have
created the new virtual server, you can add new newsgroups, feeds,
expiration policies, and virtual directories. Exchange System Manager
provides wizards for these tasks, and this exercise and the following
one are limited to creating and configuring the virtual server.
You can create
additional NNTP virtual servers to host multiple domains on a single
server or to implement separate public and private servers. Each virtual
server must have a unique IP address and TCP port combination.
Microsoft recommends assigning different IP addresses and using the
standard NNTP TCP port, 119.
Note When
you create an NNTP virtual server, you are asked to specify two
directory paths: a path for internal files and a path for newsgroup
files. In the exercise, these are both on the same partition. In a
production system, put these two files on different disk partitions.
Keeping the files on separate disk partitions reduces the chance of
corruption if the partition runs out of disk space. |
To create an NNTP virtual server, perform the following steps:
1. | Start Exchange System Manager.
| 2. | Navigate to Administrative Groups\First Administrative Group\Servers\Server01\Protocols\NNTP.
| 3. | In the console tree, right-click NNTP, point to New, and then select NNTP Virtual Server.
| 4. | The New NNTP Virtual Server Wizard starts. In the Name box, type NNTP_server1, and then click Next.
| 5. | Select the IP address of Local Area Connection 2, enter TCP port 119, and then click Next.
| 6. | Enter C:\NNTP_files\filegroup as the path to internal server files. If you are prompted to create this folder, then click OK. Click Next.
| 7. | Specify
File System as your storage medium. (You also have the option of
specifying a public folder database or a share on a remote computer at
this stage.) Click Next.
| 8. | Enter C:\NNTP_news\newsgroup as the path to store the news content. If you are prompted to create this folder, then click OK. Click Finish.
| 9. | The new NNTP virtual server is created. Unlike IMAP4 and POP3 virtual servers, new NNTP virtual servers are enabled on creation.
|
Exercise 9: Configure an NNTP Virtual Server
To configure the new NNTP virtual server, perform the following steps:
1. | Start Exchange System Manager.
| 2. | Navigate to Administrative Groups\First Administrative Group\Servers\Server01\Protocols\NNTP.
| 3. | Right-click NNTP_server1, and then click Pause.
| 4. | Right-click NNTP_server1, and then click Properties.
| 5. | On
the General tab, click Advanced. If you want to, you can alter the
settings for the IP address, TCP port, and SSL port by clicking Add.
However, you do not need to do this in this instance, so click Cancel.
| 6. | You
can limit the number of connections to prevent the NNTP virtual server
from becoming overloaded. Select the Limit Number Of Connections To
option on the General tab, and then type an integer between 1 and
1,999,999,999.
| 7. | To
limit the length of time idle connections remain logged on to the
server, specify the maximum time in the Connection Time-Out (Minutes)
box.
| 8. | To
selectively include or exclude single computers, subnets, and domains
from accessing an NNTP virtual server, click the Access tab, and then
click Connection.
| 9. | To
allow only specified computers, groups of computers, or domains to
access the virtual server, select Only The List Below, and then click
Add. You can then specify one of the following:
The static address of a single computer A group of computers with contiguous IP addresses, defined by the subnet address and mask A domain, defined by the complete domain name
| 10. | Click OK to return to the Connection dialog box.
| 11. | To
restrict specified computers, groups of computers, or domains from
accessing the virtual server, select All Except The List Below, and then
click Add. As before, you can specify a single IP address, a subnet, or
a domain. Figure 9-5, on page 9-32, shows a subnet specification.
| 12. | Click OK to return to the Connection dialog box.
| 13. | Click OK to close the Connection dialog box.
| 14. | To
control the size of individual articles that a user can post, or to
limit the total size of articles a user can post during a single
connection, click the Settings tab.
| 15. | Ensure that the Allow Client Posting check box is selected.
| 16. | To limit the size of a single article that a user can post, click Limit Post Size (KB), and then select a value.
| 17. | To
limit the amount of data that a user can post to a newsgroup during a
single connection, click Limit Connection Size (MB), and then select a
value.
| 18. | Ensure that the Allow Feed Posting check box is selected.
| 19. | To limit the size of a single article a user can post to a newsfeed, click Limit Post Size (KB), and then select a value.
| 20. | To
limit the amount of data that a user can post to a newsfeed during a
single connection, click Limit Connection Size (MB), and then select a
value.
| 21. | In
addition, you can allow other servers to pull news articles from this
server, allow or disallow control messages, and specify the SMTP server
for moderated groups, the default moderator domain, and the
administrator e-mail account. The Settings tab is shown in Figure 4.

|
Exercise 10: Create an SMTP Virtual Server
To create an additional SMTP virtual server, perform the following steps:
1. | Start Exchange System Manager.
| 2. | Navigate to Administrative Groups\First Administrative Group\Servers\Server01\Protocols\SMTP.
| 3. | In the console tree, right-click SMTP, point to New, and then select SMTP Virtual Server.
| 4. | The New SMTP Virtual Server Wizard starts. In the Name box, type SMTP_server1, and then click Next.
| 5. | From the Select The IP Address For This Virtual Server drop-down menu, select the IP address of Local Area Connection 2.
| 6. | Click Finish. The wizard closes and a disabled virtual server is created.
|
Exercise 11: Configure an SMTP Virtual Server
To configure the new SMTP virtual server, perform the following steps:
1. | Start Exchange System Manager.
| 2. | Navigate to Administrative Groups\First Administrative Group\Servers\Server01\Protocols\SMTP.
| 3. | Right-click SMTP_server1, and then click Properties.
| 4. | On
the General tab, click Advanced. You can use the Advanced dialog box to
alter the settings for the IP address and TCP port and to add a filter.
Do not change any of these settings in this exercise. Click Cancel.
| 5. | You
can limit the number of connections to prevent the SMTP virtual server
from becoming overloaded. Click Limit Number Of Connections To on the
General tab, and then type an integer between 1 and 1,999,999,999.
| 6. | To
limit the length of time idle connections remain logged on to the
server, specify the maximum time in the Connection Time-Out (Minutes)
box.
| 7. | To
selectively include or exclude single computers, subnets, and domains
from accessing an SMTP virtual server, click the Access tab, and then
click Connection.
| 8. | To
allow only specified computers, groups of computers, or domains to
access the virtual server, select Only The List Below, and then click
Add. You can then specify one of the following:
The static address of a single computer A group of computers with contiguous IP addresses, defined by the subnet address and mask A domain, defined by the complete domain name
| 9. | Click OK to return to the Connection dialog box.
| 10. | To
restrict specified computers, groups of computers, or domains from
accessing the virtual server, select All Except The List Below, and then
click Add. As before, you can specify a single IP address, a subnet, or
a domain.
| 11. | Click OK to return to the Connection dialog box.
| 12. | Click OK to close the Connection dialog box.
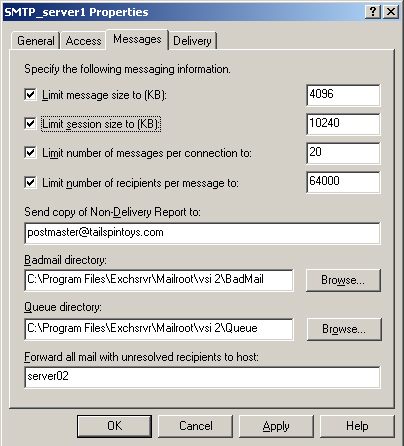
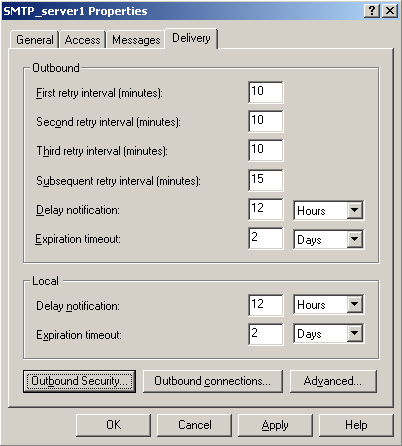
| 13. | Click the Messages and Delivery tabs, shown in Figures 5 and 6,
respectively. The configuration settings shown on these tabs are
straightforward.
| 14. | Click OK to close the virtual server Properties dialog box. |
|